
FIG. 01
RECORD DATA
Category
Avionics
TARİH
The first permanent decision we made while building our SUAS 2026 aircraft was the flight controller. On paper it looks simple: pick a board, flash the firmware, fly. Then you open ArduPilot's list of supported boards, dozens of names come up, every one of them claims to be "Pixhawk compatible," prices differ by a factor of several, and somebody on the forum is telling you to switch to PX4. There is no obvious place to start.
In this post we split that mess in two: the hardware choice (which board) and the flight stack choice (ArduPilot or PX4). People assume the two are coupled, but most boards that follow the Pixhawk standard will run either firmware — meaning you can decide them separately, on different criteria.
Every number below was checked against the official ArduPilot and PX4 documentation. Where we could not verify something we wrote "check the manufacturer's datasheet"; the source list is at the end of the post.
What does a flight controller actually do?
A flight controller (FC) has four jobs, and those four jobs drive the hardware criteria directly.
Sensor fusion. The EKF (Extended Kalman Filter) reduces the raw data coming from the IMU (inertial measurement unit — accelerometer + gyroscope), the barometer, the compass and GPS into a single state estimate: position, velocity, attitude. When the sensors disagree with each other, the EKF decides how much to trust each one. That is why redundant sensors matter.
Stabilization. The inner loop that turns attitude error into motor commands. Noise on the board feeds straight into this loop — which is the reason there is a vibration section further down.
Navigation. Routing between waypoints, the speed profile, takeoff and landing logic.
Failsafe. What happens when something breaks. ArduCopter's failsafe coverage includes:
Failsafe | What triggers it |
|---|---|
Radio | The RC transmitter signal is lost |
Battery | Battery voltage or remaining capacity drops below the threshold |
GCS | The ground control station link drops |
EKF | The state estimate becomes unreliable |
Vibration | Vibration rises to an intolerable level |
Dead Reckoning | The vehicle is still estimating position with no position reference |
Terrain Data | Terrain data is lost during terrain following |
Crash Check / Parachute | A crash is detected / the parachute is triggered |
Note: if a Radio, Battery, GCS or Terrain failsafe caused a mode change, the vehicle stays in that mode until the pilot changes modes manually.
Pixhawk is not a product, it is an open standard
"Pixhawk" is not a single board; it is a family of open hardware standards published under the Dronecode Foundation. The standard defines the FMU (flight management unit) revision, the connector pinout and, in the latest generation, the split between carrier board and FMU through the Pixhawk Autopilot Bus (PAB). What that buys you in practice: boards from different manufacturers run off the same cabling and the same firmware.
FMU revision | Example boards | Where it sits |
|---|---|---|
FMUv3 | Hex Cube Black, mRo Pixhawk | Older generation, still flying |
FMUv4 | mRo Pixracer | Small and light |
FMUv5 | Holybro Pixhawk 4 | Common mid-range |
FMUv5X | Holybro Pixhawk 5X | The move to a modular design |
FMUv6C | Holybro Pixhawk 6C / 6C Mini, Pix32 v6 | Cost-driven |
FMUv6X | Holybro Pixhawk 6X, CUAV Pixhawk V6X, RaccoonLab FMUv6X | High end, built around redundancy |
FMUv6X-RT | NXP MR-VMU-RT1176, Pixhawk 6X-RT | i.MX RT-based variant |
Let's make the difference concrete. Pixhawk 6C: STM32H743 (Cortex-M7, 480 MHz, 2 MB flash, 1 MB RAM), two IMUs (ICM-42688-P + BMI055), a single barometer (MS5611), 16 PWM outputs, 84.8 × 44 × 12.4 mm, 59.3 g. Pixhawk 6X: STM32H753, three IMUs (3× ICM-45686 on Rev 8), dual barometers (ICP20100 + BMP388), a separate vibration isolation system, a temperature-controlled IMU board with heater resistors, 16 PWM, 8 serial ports, 2 CAN. What the price difference actually buys you is redundancy and sensor stability.
Hardware selection criteria
ArduPilot's own selection guide lists these headings: sensor redundancy, number of servo/motor outputs, number of UARTs, external buses (I2C, CAN), analog I/O, integrated features, vibration isolation and IMU heater, physical size, cost. Three of them are what actually separates boards on an autonomous mission:
1. Flash size. In some configurations the ArduPilot firmware runs past 1 MB, so boards with 1 MB of flash get a build with features stripped out. Which features get dropped varies from board to board, and the exact list lives in the features.txt file in the firmware folder. F4-based boards cannot run Lua scripts at all. If you are planning autonomous missions, start with an H7-class board with 2 MB of flash; do not spend time later wondering why a feature is missing.
2. UART budget. This is where the most common planning mistake happens. Do a simple count:
UARTs required= telemetry + GPS + companion + gimbal/camera + ESC telemetry + 1 spare
Our aircraft | UARTs |
|---|---|
Telemetry radio | 1 |
GPS/compass | 1 |
Jetson Orin NX (MAVLink) | 1 |
SIYI A8 mini control | 1 |
Spare | 1 |
Total | 5 |
If that number exceeds the board's serial port count you either change the board or move something onto CAN — and it is cheaper to know either way before you build the wiring loom.
3. Vibration isolation and SD logging. Built-in isolation and an IMU heater are the features that shorten tuning time. The SD card, on the other hand, is not negotiable: no logs means no debugging, and Lua scripts load off the SD card as well.
ArduPilot or PX4?
Criterion | ArduPilot | PX4 |
|---|---|---|
License | GPLv3 — if you distribute changes you owe source code and attribution | BSD 3-clause — permits closed-source derivative products |
Vehicle types | Copter, Plane, Rover, Sub, Blimp, Antenna Tracker | Copter, Plane, VTOL, Rover, Airship, Autogyro, Spacecraft, UUV |
Architecture | Cooperative scheduler over a HAL, with scheduled tasks | Modular structure over the uORB publish/subscribe bus |
Scripting | Built-in Lua scripting | No built-in Lua equivalent; modules are written in C++ |
Typical GCS | Mission Planner (Windows), QGroundControl | QGroundControl (Windows/macOS/Linux/iOS/Android) |
Parameter depth | Very broad; a large tuning surface | Narrower, with relatively more settled defaults |
Pick ArduPilot if: you are going to tune deeply through parameters, you want to run logic onboard the aircraft in Lua, you will use Mission Planner's log analysis and tuning tools, and the GPLv3 obligation is not a problem for you (for a competition team it usually is not).
Pick PX4 if: you are going to embed the firmware in a closed-source product and commercialize it, you will write C++ modules in the uORB-based modular architecture, you need tight ROS 2 integration over the uXRCE-DDS bridge, or QGroundControl is already your organization's standard.
We settled on ArduPilot: Lua scripting, Mission Planner's log and tuning tools, and the servo logic we needed for the airdrop all took less code on that side. That is not a claim of superiority — it is a preference that follows from our workload.
Three features that genuinely matter on an autonomous mission
GUIDED mode. The mode in which the companion computer commands the vehicle. It accepts position targets, velocity and acceleration commands, and attitude targets via SET_ATTITUDE_TARGET; DO_CHANGE_SPEED lets you change speed in flight. The GUIDED_NoGPS variant accepts attitude targets only. Our detect → align → release chain runs on top of this mode; the details are in our companion computer and MAVLink guide.
Lua scripting. You turn it on with SCR_ENABLE = 1, and scripts go in the APM/scripts folder on the SD card. Hardware requirements: at least 2 MB of flash, at least 80 KB of RAM, and an SD card. The SCR_HEAP_SIZE default ranges from 43 KB to 204.8 KB depending on the processor; many of the stock applets want more than 300 KB, so you may have to grow the heap by hand.
Companion link. Three parameters are all it takes to hook up the Jetson Orin NX:
Verify these in SITL before you fly — we covered the setup in our SITL + Gazebo post. The Jetson side has its own setup guide.
Vibration: the measurable consequence of the board you picked
The only objective place you can see how the board choice affects flight quality is the VIBE values in the log.
VIBE X/Y/Z | Interpretation |
|---|---|
< 30 m/s² | Normally acceptable |
30–60 m/s² | May cause problems |
> 60 m/s² | Almost always a problem for position and altitude hold |
The CLIP0/1/2 counters count the moments an accelerometer hits its 16 G limit. Zero is ideal; values below 100 caused by hard landings are usually tolerable. A counter that climbs steadily across the whole log is a serious vibration problem.
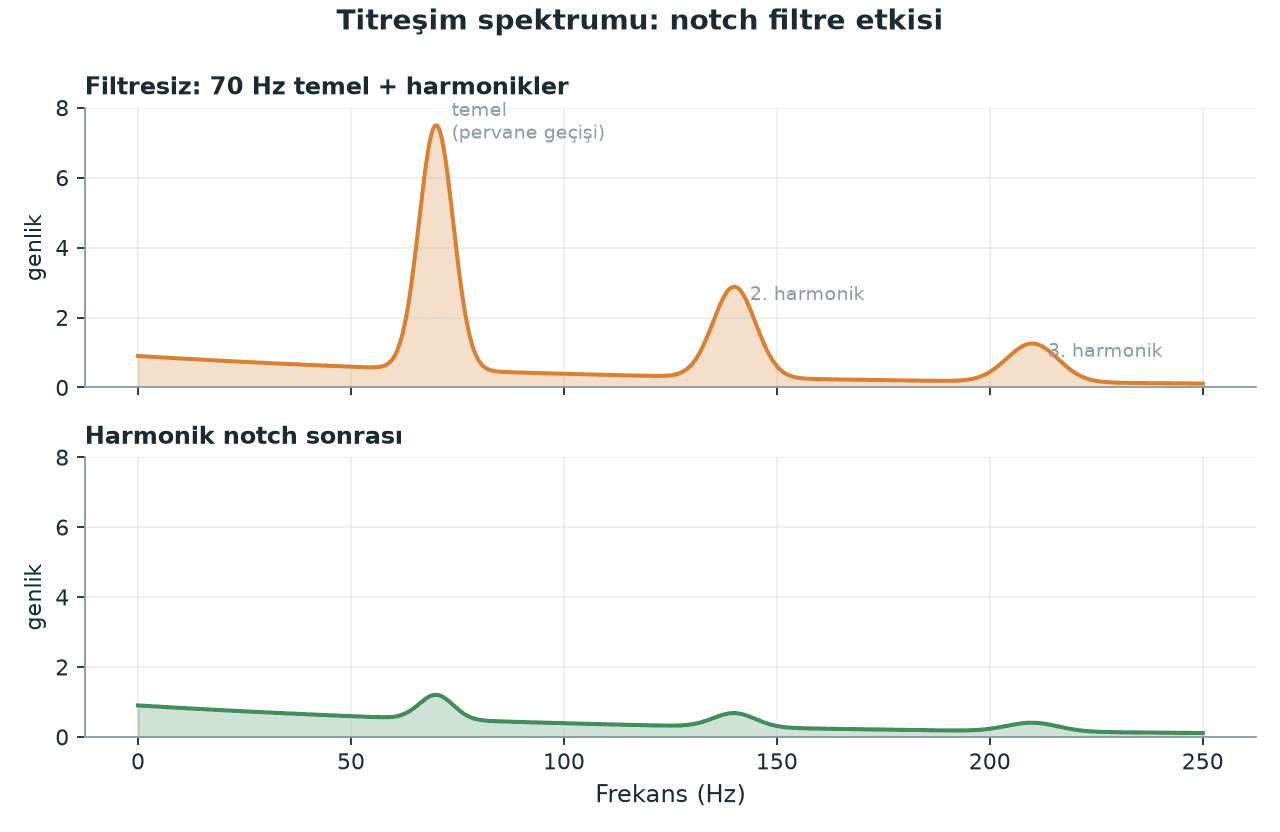
The way to suppress vibration with filtering is the harmonic notch filter. Throttle-based setup:
f_hover[Hz] =hover_motor_rpm[RPM] / 60
A worked example. We measured 4200 RPM of motor speed in hover and a hover throttle of 0.35:
Parameter | Value |
|---|---|
| 4200 / 60 = 70 Hz |
| 70 |
| 70 / 2 = 35 Hz |
| 0.35 |
If the post-filter FFT puts the lowest motor noise at 55 Hz:
INS_HNTCH_REF= 0.35 * (55/70)^2 = 0.35 * 0.617 = 0.216
Read f_hover off the raw IMU log (with an FFT) instead of guessing it.
Traps people keep falling into
Cheap clone boards. The ArduPilot documentation stays neutral on clones: many of them may be perfectly adequate, but the fact that firmware is provided for a board does not amount to an endorsement. The risk concentrates in the sensors and the power circuitry: counterfeit or low-bin IMUs, weak regulators, poor connectors. None of that shows up on the bench — it shows up in the air. On a competition aircraft, the FC is not where you save money.
Trying to fix vibration with tuning. A notch filter masks a mechanical problem, it does not solve it. Prop balance, motor mounts, frame resonance and FC mounting first. Filter afterwards.
Compass calibration. Do not calibrate near a metal table, a phone, a laptop or a power supply. If calibration keeps failing, try raising COMPASS_OFFS_MAX from 850 to 2000–3000 and loosening the "Fitness" setting in Mission Planner; if you trust the external compass, you can disable the inconsistent internal ones. Reboot the board after calibration.
The 1 MB flash surprise. Discovering there is no terrain following after the board is already on your desk is too late. Before you buy, look at that board's features.txt, or confirm that the Custom Firmware Build Server can produce a build with the feature set you want.
Safety. Run motor and ESC tests with the propellers removed — that includes mode tests, failsafe tests and direction checks. Never change wiring on the board with a LiPo connected; always unplug the battery first. Verify the power module's current and voltage limits against the manufacturer's datasheet, and do not fly autonomously before the battery failsafe is configured. A loose connector on a high-current line is both a fire risk and an in-flight power loss risk.
Practical summary
Choose the hardware and the firmware separately. Most boards that follow the Pixhawk standard will run either flight stack; reversing the decision is cheap on the firmware side and expensive on the hardware side.
Start with an H7-class board with 2 MB of flash. Lua, terrain following and the full feature set all require it; F4 boards cannot run Lua.
Write the UART budget down before you wire anything. Telemetry + GPS + companion + gimbal + 1 spare — if the total exceeds the board's ports, changing the plan rather than the board has already become too late.
Decide on the license, not on the "which one is better" argument. If a closed-source product is the goal, PX4 (BSD); if it is an open-source competition aircraft, ArduPilot's GPLv3 is not a problem.
The first thing you look at after the first flight should be VIBE and CLIP. Aim for under 30 m/s², and if the CLIP counter is growing, fix the mechanics before you move on to tuning.
